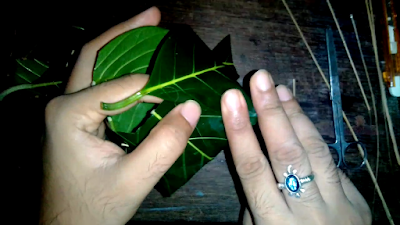
How to make jack-fruit leaf Kotte Idli/ Kotte kadubu mould?(ಹಲಸಿನ ಎಲೆ ಕೊಟ್ಟೆ ಇಡ್ಲಿ/ಕೊಟ್ಟೆಕಡುಬು ಅಚ್ಚನ್ನು ಹೇಗೆ ತಯಾರಿಸುವುದು.)
Step by step method to make jack-fruit leaf mould please follow the steps below. please follow the steps
Requirement for 1 kotta/mould
Jack fruit leaves-4 nos.Thin stick extracted from coconut leaves/ Bamboo/ Toothpicks.
NOTE: Prepare the sticks as thin as possible otherwise the leaf will shears off.
Step 1: Take 4 jack-fruit leaves, which should be of almost same in size.

Step 2: Take 2 leaves together and place one over another as shown.

Step 3: then take grouped leaves and place 90° as shown.

Step 4: Join this leaves together in the same position with thin stick.


Step 5: Next take lowermost leaf and flip upward.


Step 6: Then take adjacent leaf and overlap one another.

Step 7: Before joining this ensure there should not be any gap between the leaves.


Step 8: Join the leaves.

Step 9: Take next adjacent leaf and overlap.

Step 10: Join the leaves by sticks.

Step 11: If you feel the joining strength is not enough add extra sticks.

Step 12: Make the entry point to the mould by trimming off leaf stalk.

Step 13: Every time you ensure their should not be any gap between the leaves.

Step 14: Join last leaf.


Step 6: Then take adjacent leaf and overlap one another.

Step 7: Before joining this ensure there should not be any gap between the leaves.


Step 8: Join the leaves.

Step 9: Take next adjacent leaf and overlap.

Step 10: Join the leaves by sticks.

Step 11: If you feel the joining strength is not enough add extra sticks.

Step 12: Make the entry point to the mould by trimming off leaf stalk.

Step 13: Every time you ensure their should not be any gap between the leaves.

Step 14: Join last leaf.
Click here for the Kotte Idli/ Kotte kadubu recipe


Comments
Post a Comment